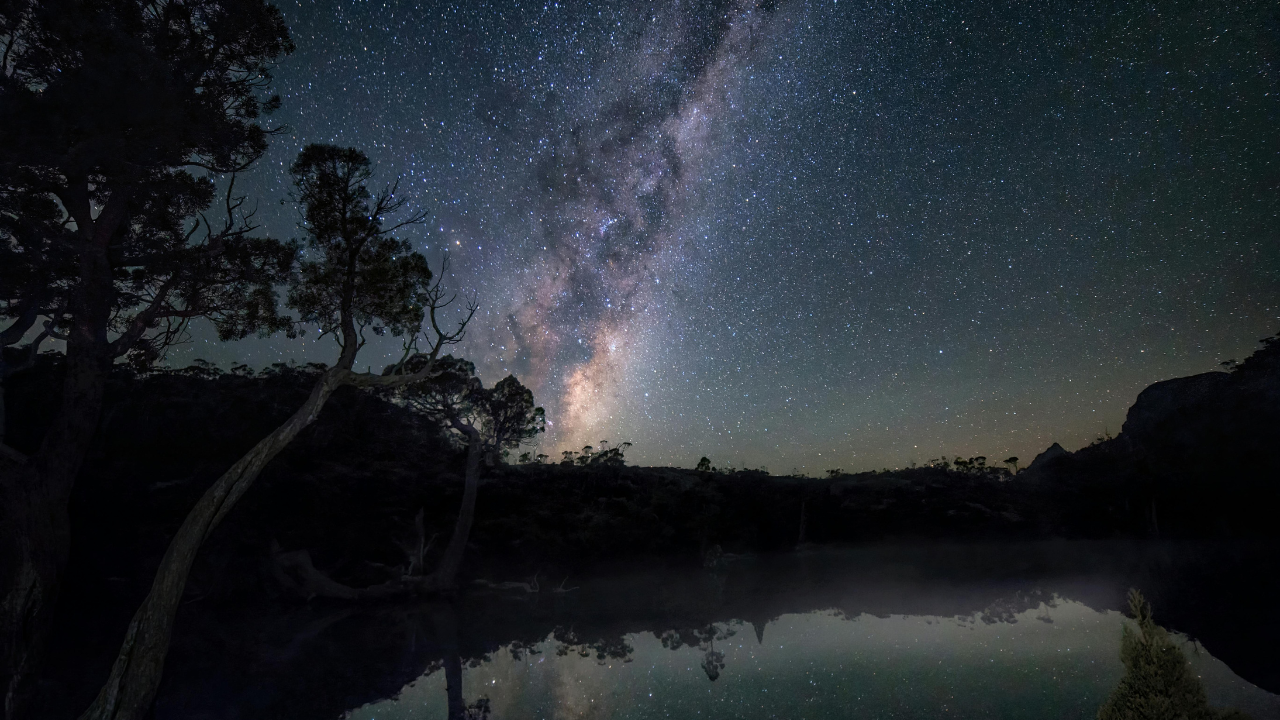
You pack up your gear, drive two hours into the middle of nowhere, freeze in a dark field, and press the shutter. On your tiny camera screen, everything looks fine. But when you load the files onto your computer the next day, frustration hits. The stars aren't crisp pinpoints. They look like tiny, oblong smudges. The core of our galaxy looks muddy.
Capturing clean night sky images isn't about owning a five-thousand-dollar setup. It is about working around the literal movement of the planet and nailing specific, unyielding settings. June offers some of the most dramatic views of the galactic core, but the summer window is punishingly short. If you show up unprepared, you will waste the best night of the month.
Let's skip the vague advice and break down the exact math, physics, and settings required to get sharp results right now.
The Brutal Truth About The June Window
June features the summer solstice, meaning nights are at their absolute shortest in the Northern Hemisphere. You only have a tiny pocket of true astronomical darkness. To make matters tougher, the bright core of the Milky Way hangs incredibly low on the southern horizon. If there is a city twenty miles south of you, its light dome will completely erase your shot.
The moon phase dictates your entire schedule. A bright moon acts like a massive spotlight, bleaching out the delicate gases of the celestial core. For June 2026, your primary target is the stretch surrounding the new moon on June 14. Specifically, the nights between June 8 and June 17 offer the blackest skies.
During these dark hours, look to the southeastern sky around midnight. You can trace the galaxy by finding the Summer Triangle, a massive shape formed by the bright stars Vega, Deneb, and Altair. The glowing band of the Milky Way streams directly down from Deneb, through Altair, straight down to the southern horizon where the core sits.
Stop Using The 500 Rule
For years, photography blogs repeated the old "500 Rule" for setting shutter speed. You simply divide 500 by your focal length to find how long you can keep the shutter open before stars start to trail.
It's outdated. Modern cameras have tiny pixels packed onto high-resolution sensors. They notice star movement instantly. If you use a 24mm lens on a full-frame camera, the old rule says you can shoot for 20 seconds. Do that, and your stars will look oblong.
Instead, rely on the stricter NPF rule, which factors in your aperture and sensor pixel size. If you want perfectly round stars without calculating complex math in the dark, use these maximum exposure times as your absolute ceiling:
- 14mm on Full-Frame: 25 seconds
- 16mm on Full-Frame: 20 seconds
- 24mm on Full-Frame: 15 seconds
- 35mm on Full-Frame: 10 seconds
If you are shooting on an APS-C crop sensor camera, multiply your actual focal length by 1.5 first. A 16mm lens on a crop sensor behaves like a 24mm lens, meaning you must drop your exposure time to 15 seconds to prevent trailing.
The Zero Noise Exposure Strategy
Night photography requires balancing the exposure triangle to gather ancient, faint light without generating a pile of digital grain.
Put your camera into full manual mode. Turn off image stabilization completely. When your camera is locked on a sturdy tripod, stabilization mechanisms can actually cause tiny internal vibrations, ruining sharpness. Turn off long exposure noise reduction too. It forces the camera to take a second blank exposure of equal length, cutting your shooting time in half and killing your battery.
Aperture: Widest possible (f/1.4 to f/2.8)
ISO: 3200 to 6400 (Native range)
White Balance: Manual 4000K
Focus: Manual (Pinpoint calibration)
Your aperture needs to be wide open to collect maximum light. Use f/2.8 or lower. If your lens maxes out at f/4, you can still get a shot, but you will need to push your ISO higher to compensate.
Speaking of ISO, don't be terrified of high numbers. People often shoot at ISO 800 because they fear noise, resulting in an underexposed, completely black image. Trying to brighten a dark photo in editing software introduces massive, ugly grain into the shadows. It is far better to capture a bright exposure cleanly on location. Set your ISO to 3200 or 6400.
Never leave your white balance on auto. The camera will constantly shift colors between frames, turning your sky an artificial shade of muddy orange or sickly green. Lock it manually at 4000 Kelvin. This keeps the night sky looking naturally blue-black, making your raw file editing predictable.
The LCD Focus Trick
Autofocus cannot function in the pitch black. It will hunt back and forth endlessly, locking onto nothing. You must switch your lens to manual focus.
Do not trust the infinity symbol on your lens barrel. It is rarely accurate due to temperature changes expanding the glass components. Instead, turn on your camera's live view mode. Find the absolute brightest star in the sky or a distant light on the horizon. Use the digital zoom buttons on the back of your camera body to magnify that single star on your LCD screen until it fills the display.
Slowly twist the manual focus ring. Watch the star switch from a big, blurry blob into a tiny, sharp pinpoint of light. Once it is as small and bright as possible, leave the ring alone. Tape it down with painter's tape if you are worried about bumping it in the dark.
Before you start shooting a sequence, take one test frame and review it. Zoom in to 100% on the image preview. If the stars are tack-sharp, you're good to go. If they look fuzzy, your focus is off by a hair. Reset and adjust.
To trigger the shutter, use a two-second or five-second built-in timer delay. Pressing the physical shutter button introduces a tiny shake from your hand that blurs the shot. Stepping back allows the tripod to settle before the exposure begins.
Scouting Real Dark Skies
You cannot shoot the core from a suburban backyard. Light pollution scatters through the atmosphere, completely erasing faint starlight.
Look up a light pollution map online and analyze locations using the Bortle scale, which rates darkness from 1 to 9. A level 9 is a city center where only a few planets are visible. A level 1 is pristine, primeval darkness. You want to aim for a Bortle level 4 or darker to get the necessary contrast for the galactic core.
In the United States, look toward designated International Dark Sky Places. Spots like Death Valley National Park or the remote corners of Utah offer ideal conditions. If you are on the East Coast, the Cherry Springs State Park in Pennsylvania provides a rare pocket of deep darkness.
When you get to your location, remember that pointing your camera directly up at an empty sky results in a boring photo. It is just a collection of dots. To create scale and depth, lock down a compelling foreground element. Look for jagged rock formations, lone trees, or old ruins.
Use a red headlamp while setting up your gear. White flashlights immediately destroy your night vision, taking your eyes about twenty minutes to readapt to the dark.
Pack a microfiber cloth in your pocket. Summer nights can drop in temperature quickly, causing dew to form silently across the front element of your lens. Wipe the glass down between frames if you notice the stars starting to look unaccountably soft or glowing.
To walk away with a clean file, pack a sturdy tripod, clear your calendar for the moonless nights around June 14, lock your focus manually on a single star, and keep your shutter speed under the trailing limit.